

Christmas Kitchen Chronicles
Every morsel of Christmas magic from my home to yours

Christmas magic is great love made festive. This past Christmas, we celebrated in our new house with one of our dearest friends in the world. Between Christmas movies, card games, gift exchanges, and our annual family Bible study, we enjoyed some delicious food.
Amid all that joy, the kitchen delivered some serious highlights. From cookies and cake to quiche, everyone was raving. In fact, my Japanese milk buns even landed me a standing Sunday lunch invite.
Since I’ve been asked by so many (via DMs, phone calls, texts, and across the table), I’ve put together a Christmas Chronicle of sorts to help you make whichever of these recipes you’ve been clamoring for. Remember, if I can do it so can you. And if it doesn’t turn out perfectly (like my gingerbread roll that turned into more of a gingerbread fold) it’ll still be delicious. ;) And we’ll start with the one thing no Christmas is complete without...
If you missed my latest, check it out here:
Cakes and Cookies
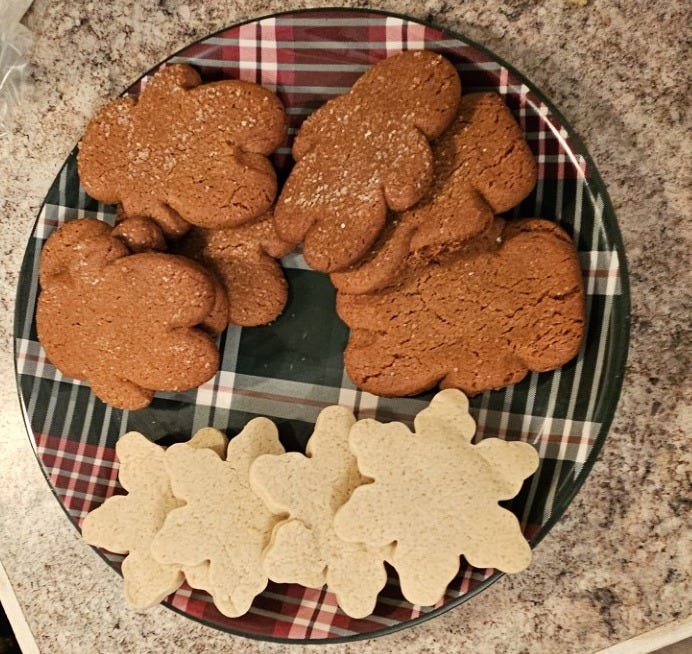
What is Christmas without Christmas cookies? Even Jesus enjoyed sweet treats — we read of Him eating dates, figs, and grapes, and sharing honey cakes or fruit desserts common in His day. But in our time, cookies are the quintessential holiday icon, so they were the very first thing I locked into my menu.
I wanted everyone to have their favorite holiday cookie, which is why I made three different kinds of Christmas cookies. Two of them were entirely from scratch, and one of them had a devil’s food cake base (Aldi’s store brand was what I grabbed). Using a cake mix base was an idea I got from a recent recipe my friend Courtney O'Dell shared on her wonderful blog Sweet C’s Designs which is a must-read for anyone who enjoys spending time in the kitchen.
The odd thing about “bakery level” (my husband’s words, not mine) cookies is that you’d think since they’re so good you’d want to scarf down a plate, but they’re so perfectly crafted that they satiate with more ease, causing you to actually eat less than lower quality cookies.
Gingerbread Roll with Eggnog Cream Cheese Frosting
For the Gingerbread Sponge cake combine
2 large eggs
½ cup (100g) packed brown sugar
⅓ cup (100g) unsulfured molasses
5 ½ tablespoons (80g) unsweetened applesauce
½ cup (60–65g) cake flour (spooned and leveled) [all-purpose flour can work, if need be, although cake flour yields a more tender crumb]
½ tablespoon white cane sugar (optional, for a touch of extra tenderness)
⅔ teaspoon baking soda (eyeball slightly less than 1 tsp if needed)
1 teaspoon ground ginger
½ heaping teaspoon ground cinnamon
½ tbsp of cane sugar
¼ teaspoon ground cloves
¼ teaspoon kosher salt
How to bake
Preheat oven to 350°F.
Line the bottom and sides of 8x12x2.5-inch glass pan with parchment paper (essential for easy release—grease lightly under and over the parchment).
Spread the batter evenly (it won’t fill the pan to the top; that’s good—it stays thin).
Bake for 10–14 minutes (a glass pans retain heat, so check early). Rotate halfway when it’s about halfway done. It’s done when the center springs back lightly or a tester has a few moist crumbs—do not overbake, as dry cakes crack easily.
The cake will be about ½-inch thick or less, similar to the original.
How to roll
Cool in the pan for exactly 5 minutes (no longer, seriously, this was part of why it was a “fold”).
Run a knife around edges to loosen.
Generously sift powdered sugar over the top (prevents sticking).
Cover with a second sheet of parchment, then flip onto a cutting board or rack.
Peel off the bottom parchment carefully.
Sift more powdered sugar on the new top (the back side).
Starting from a short side (the 8-inch end), roll the warm cake snugly into a coil with the parchment underneath (use the parchment to help roll tightly without touching the cake directly).
Place seam-side down and cool completely rolled up (2 hours at room temp or 1 hour in fridge). This “trains” the shape.
If you’re wondering why it doesn’t have butter, it’s because molasses, brown sugar, and applesauce supply all the moisture and richness the cake requires. Molasses is deeply flavorful and very hygroscopic (it attracts and holds moisture), so the cake stays soft and pliable for days without any fat. (I thought that was weird too, as I was researching things for this recipe.)
Eggnog Cream Cheese Frosting
8 oz (226g) full-fat cream cheese, softened (it really needs to be softened to room temperature, so it doesn’t have weird clumps)
¼ cup (57g) unsalted butter, softened (optional for richness)
1–1¼ cups (120–150g) powdered sugar (adjust for sweetness)
⅓–½ cup (80–120ml) eggnog (start low, add to taste/texture)
¼–½ teaspoon ground nutmeg
¼–½ cinnamon
½ tbsp of vanilla extract
½ tbsp of light corn syrup
This keeps it softer, more spreadable, improves texture and shine, prevents the frosting getting “crusty” as well as helping the frosting move with the cake. You can omit it if you so choose, but I do recommend it if you have it on hand as I did.
Combine this all in your KitchenAid mixer and whip until smooth on medium speed.
Note: This eggnog cream cheese frosting also tastes divine on the sugar cookies coming up a few recipes from now!
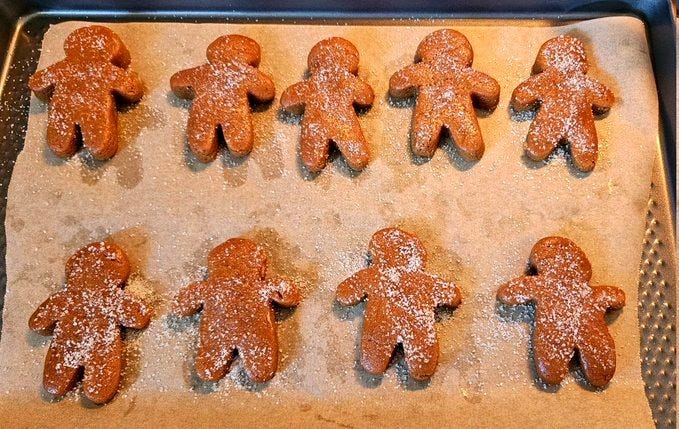
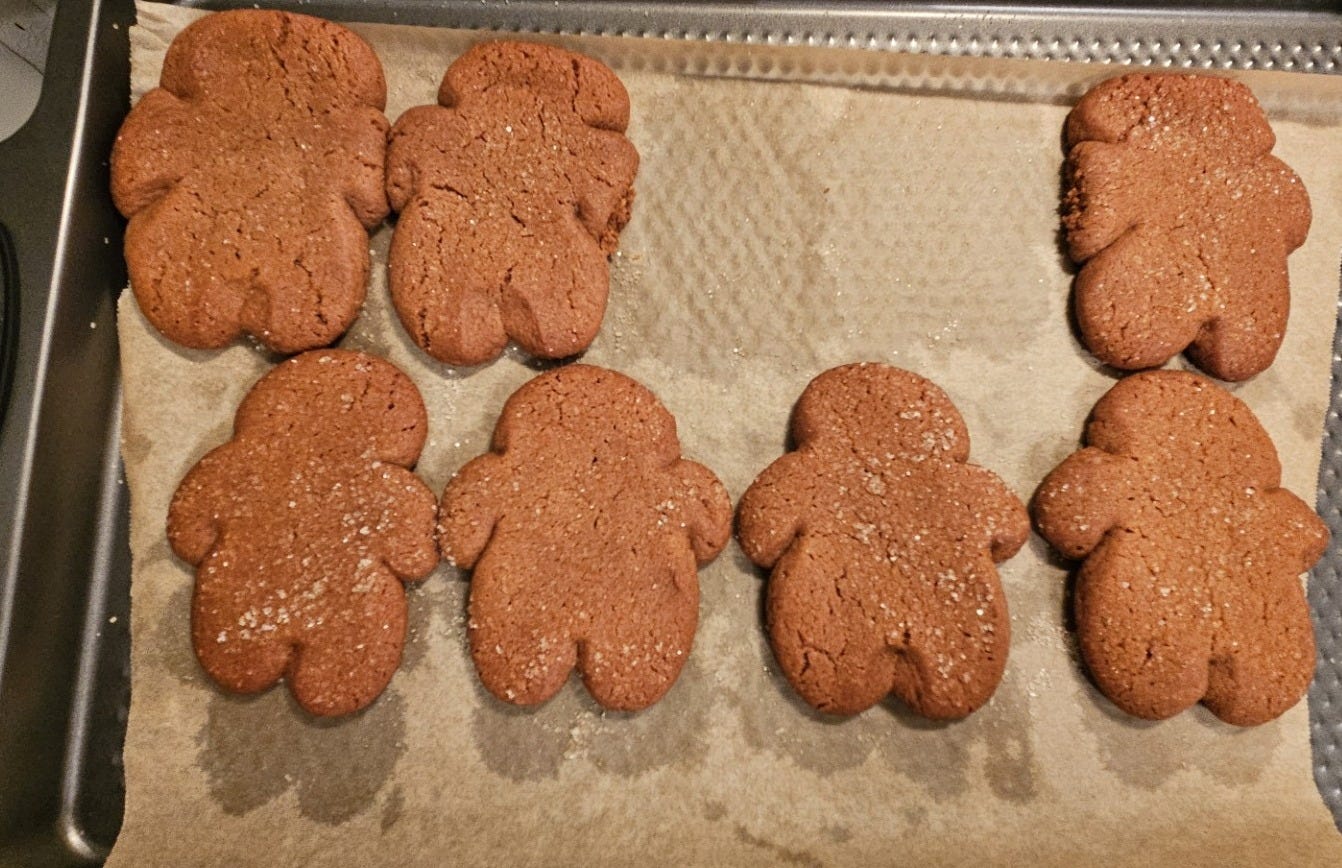
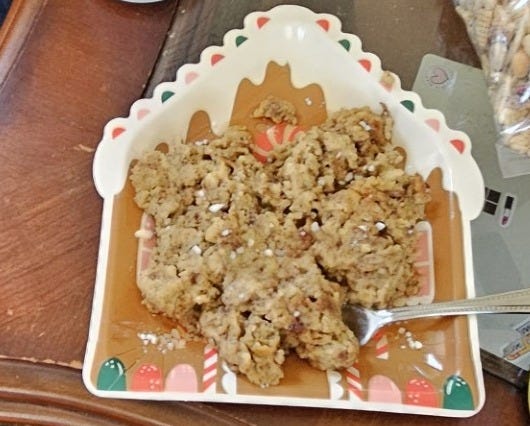
Ginger Snaps
My dear friend, who got to join us this Christmas, once told me years ago that her favorite holiday cookie was a gingersnap. After researching, watching videos, and learning as many tips as possible, I was able to fulfill one of my Christmas resolutions. That is, namely, to make the perfect ginger snap cookie. This is a recipe I came across from 1964, and let me tell you, it tastes just as good on the brink of 2026.
3/4 cup shortening
I got the Crisco bars with pre-measured lines on it; it helps when it’s room temperature so you can cream it more easily
1 cup of sugar
Then you cream these together (if you don’t know what that means, toss these both in your KitchenAid mixer [or stir by hand] and mix the heck out of them until they’re one thing)
1 large egg (most Aldi cartons come with large eggs)
¼ cup of molasses (do not try to taste it alone, yuck!)
2 cups of flour
I find it helpful if you have your mixer on the “stir” setting as you slowly add it in 1/2 cup at a time then add your spices
1 tsp of cinnamon
1 and ¼ tsp of ginger
1/8 tsp of cloves (you can halfway fill the ¼ tsp if you don’t have 1/8 tsp)
2 tsp of baking soda
How to make it
Combine all of this together
Roll them out and cut them out for an extra festive flourish (even though it’s primarily a drop cookie) or portion them out and drop them on the parchment paper on top of the cookie sheet then flatten them
you can do this with a glass; if you want them perfectly round use a glass or a mug upside down when they’re still warm and spin them around to make them perfectly circular
Then add the sugar on top of them (or if making as a regular round cookie, roll them in sugar; I used organic cane sugar)
Chill for at least a half hour in the fridge, or flash freeze them for 15 minutes in your freezer if you cut them out (otherwise your ginger snap people will be tubby all of a sudden)
Bake at 350 degrees for 13-15 minutes (take them out a minute or two early when they’re 99% done as they’ll keep baking on the pan)
Let cool (I know it’s hard) and enjoy
These have a great crispness to them while simultaneously melting in your mouth. I was blown away, as was the dear friend who claims them as her favorite cookie. If you use 1 tbsp scoop, you can get as many as 4 dozen cookies. I ended up with 8 fresh baked, and a bag of dough for later.
Pro tip: If you make a batch of cookie dough from scratch you can easily portion it out and put it in a Ziplock bag so that you can always have fresh baked cookies on hand for company or last-minute hosting.
Sugar Cookies
The sugar cookies came from a recipe on Sally’s Baking Addiction. I made them from scratch at 2 a.m. as the Japanese milk buns did their first rise, after I realized that we didn’t have ginger for the gingersnaps as I went to add it as the last ingredient. (Oops! Kyle saved the day and grabbed it the next morning.) I pivoted, and once the sugar cookie dough was made, Kyle rolled them out between two sheets of parchment paper, and we stored them to be cut out into cute little festive snowflakes. Then he forced my inner project manager to turn off and made me go to sleep.
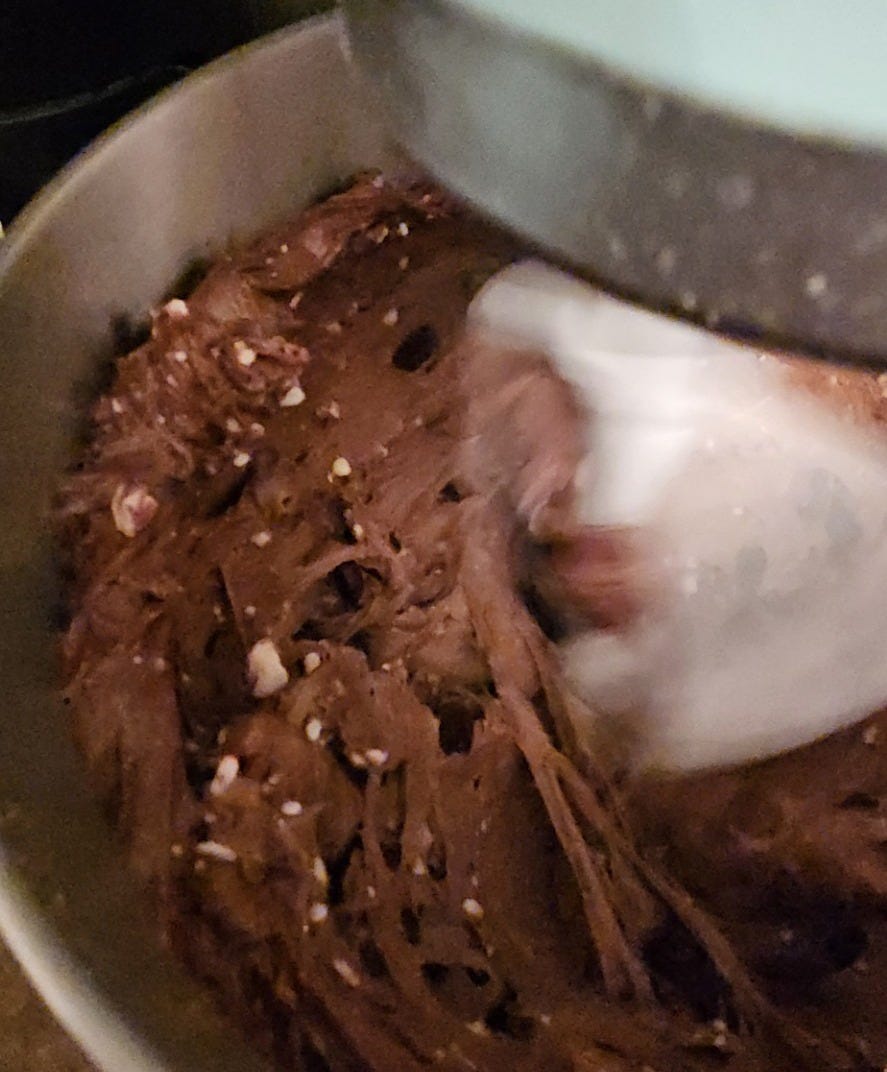
Peppermint Bark Cookies
I invented this recipe, so the rule is that I get to name it, but I’m not sure what to call it. Gary? Christmas magic? Cocoa delights? Peppermint enchantment? BeTtEr ThAn MaKiNg LoVe cookies? Nah, let’s go with peppermint bark cookies. Haha.
Call it what you want, but — as the men in my family would say — these slap. They’re almost brownie like, which is personally hilarious because I for whatever reason, no matter what recipe I follow, cannot make brownies. Somehow the same girl that made the Milkbar birthday cake from scratch for her husband’s birthday cannot make brownies. We’re all somewhere on our kitchen journey. But sometimes I invent things that are made with love and imagination, and they come out incredible. Thankfully, this was one of those times.
1 box of Devil’s Food cake mix
2 room temperature eggs
½ tsp peppermint extract
¼ cup room temperature softened unsalted butter
1 ½ cups of Hershey white chocolate peppermint kisses (put these through a food processor)
1 cup of dark chocolate chips
How to make it
Cream the cake mix and the butter then add in the eggs
Combine cookie add ins thoroughly
When you think they’re combined thoroughly, mix for at least one more minute
Bake at 350 degrees for 10-15 minutes
These taste like Christmas, even when it ends up being 85 degrees on Christmas day and you need to trade your matching PJ bottoms in for shorts. Depending on the size, they can yield up to two dozen cookies (or about twelve massive cookies if you leave your husband in charge of portioning them while you tend to the stray Christmas puppy you and your family saved). Regardless of the size, they’re scrumptious. Just enough mint not to be overpowering, and enough chocolate and white chocolate to taste like peppermint bark.
Brunch
The women of older generations in my husband’s family struggle in the kitchen (think lack of seasoning, stuffing store-bought goodies in crockpots, and hiding the evidence for the dishes that are tasty). But one shining moment has always been the French toast casserole, so naturally I wanted to bring that joy with us across the country. Weeks before Christmas, I decided to merge the cinnamon bread French toast of my upbringing with my husband’s family’s casserole—but I had to invent the recipe myself.
Eggnog French Toast Casserole
I’m not a fan of eggnog because I don’t like the thickness of it, yet it serves perfectly when it is used as part of a custard base for a French toast casserole. If you’re hesitant to try this because you don’t love eggnog, know that everyone who had it — eggnog lovers and haters alike — couldn’t stop talking about it for a week after and all went back for seconds.
2 cups of eggnog
1 cup of whole milk
8 large eggs
¼ cup of brown sugar (up to 1 cup sprinkled on top and stirred in as it’s cooking)
1 full loaf of cinnamon swirl bread (Pepperidge Farm is the go-to, but Thomas’ has a tasty one if they’re out) cubed 1”
The cinnamon bread pairs amazingly with eggnog’s spices—it’s like cinnamon-eggnog heaven.
1 tbsp of vanilla extract (I opt for real, with vanilla beans from Madagascar)
½ tsp nutmeg
¼ tsp salt
avocado oil spray for greasing (butter can also work)
How to make it
Generously spray or butter the inside of your slow cooker (4–6-quart size works best).
In a large bowl, whisk together the eggs, eggnog, whole milk, brown sugar, vanilla, nutmeg, and salt until smooth.
Place the bread cubes in the greased slow cooker. Pour the egg mixture evenly over the bread. Gently press down with a spoon so the bread soaks up the liquid. (If it looks dry on top, that’s okay — it will absorb overnight.)
Cover the slow cooker insert (if removable) with the lid, plastic wrap, or foil. Refrigerate overnight (maximum 12 hours/minimum 4 hours).
Place the insert in the crockpot. Cook on low for 4-6 hours or high for 2-3 hours, until the center is set and no longer soggy (a knife inserted should come out clean). Avoid lifting the lid too often to prevent heat loss but quickly stir it every hour on the hour.
Let it rest for 5-10 minutes after cooking. Then serve. Some of us had it with real maple syrup, while others added a little powdered sugar to theirs.
This is great to cook on high and have ready for brunch post-presents (or shared activity). It’s easy, efficient, and indulgent without being expensive (especially depending on what you have on hand). However, to prevent burning if your crockpot runs hot, I recommend checking early to avoid overcooking the edges. Also, leftovers reheat well in the microwave so when guests are gone and you’re tired you can easily whip up any that’s leftover, but it serves 8-10 generously.
Dinner
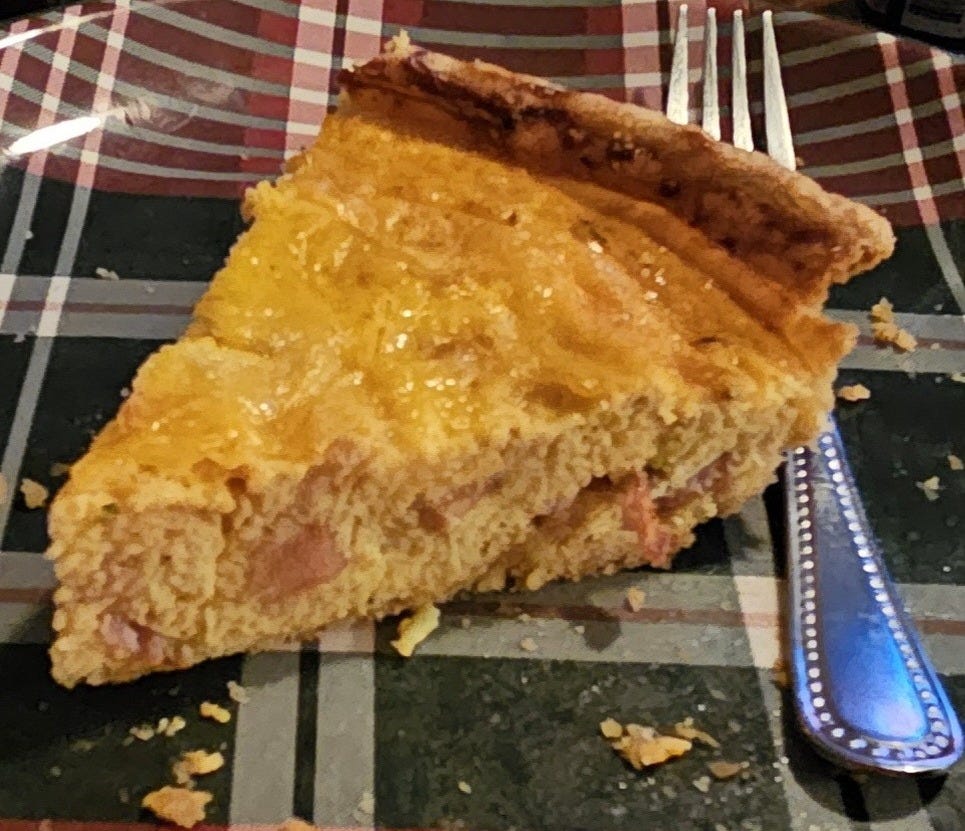
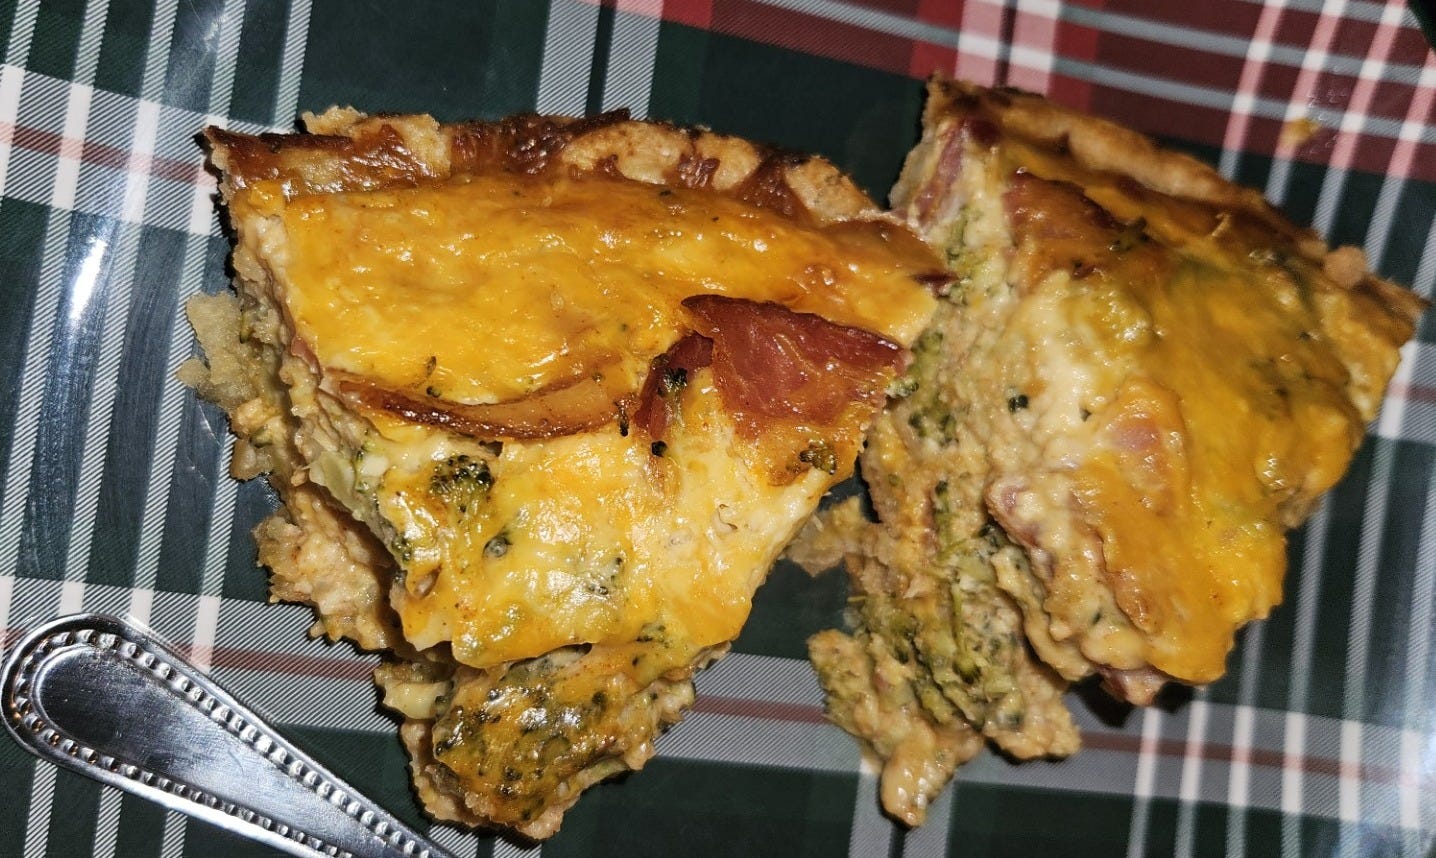
Initially, I’d planned on doing a quiche for Christmas Eve dinner and a pot roast with Japanese milk buns for Christmas dinner, but it didn’t go exactly as planned. Even still, it all worked out in a lovely and tasty way. We had the Japanese milk buns for Sunday dinner with my friend’s darling family. The pot roast worked well for New Year’s Eve instead (we froze the meat we got from the butcher), but we ended up devouring the quiche. My husband who doesn’t traditionally request quiche fought for the last slice. Even my bestie who normally isn’t a fan of quiche quite enjoyed it!
She’s not a fan of too many veggies, so I made one that was broccoli, cheddar, and bacon and one that was bacon and cheddar just in case as I wanted to ensure she was completely satiated with every aspect of our holiday.
Note: I season with my heart when I’m cooking, so I’ll add some approximations as best I can but I recommend seasoning with yours!
1 steam in a bag broccoli steamed, drained, and squeezed, chopped into bite-size pieces (at least ½ of the bag; I used the full bag)
I recommend the florets as you get more broccoli heads instead of stocks, traditionally.
Drain and squeeze out as much excess moisture as possible. Use a clean kitchen towel, paper towels, or a fine mesh strainer to press out the water. This prevents a watery quiche.
For the non-broccoli quiche, keep everything the same but increase the bacon and cheese and add an additional egg. They can be stored on a large baking sheet, covered in the fridge overnight if you want to make ahead before your company arrives to maximize your time with them.
4-5 eggs
½ tsp Cajun seasoning
2 tsp smoked paprika
1 tbsp onion powder
1 tbsp garlic powder
1-2 tsp(s) minced garlic
¼ tsp of nutmeg
1 tbsp parmesan
A pinch of pink Himalayan salt and pepper
7 cooked slices of applewood smoked bacon broken up
1 frozen 9” deep dish pie shell
1 to 1¼ cups whole milk or cream
The classic ratio is roughly 1 egg: ½ cup dairy
1½ cups Shredded cheddar cheese (you can shred your own or get it pre-shredded)
How to make it
Place the frozen pie crust on a baking sheet.
Layer half the cheddar cheese (¾ cup) in the bottom of the crust.
Evenly distribute the bacon crumbles and broccoli.
In a bowl, whisk together 4 eggs, 1 cup milk, jarred minced garlic (1–2 tsp), Cajun seasoning (¼–½ tsp), onion powder (½–1 tsp), garlic powder (½–1 tsp), smoked paprika (¼–½ tsp), and salt/pepper to taste.
Pour the egg mixture over the fillings in the crust.
Top with the remaining ¾ cup cheddar cheese.
Cover tightly with plastic wrap or foil and refrigerate for 12–24 hours.
Preheat oven to 350°F (175°C).
Remove quiche from fridge and bake on the baking sheet for 50–70 minutes. Check at 50 minutes—center should be set with a slight jiggle. If needed, bake an additional 10–20 minutes until a knife inserted in the center comes out clean (internal temp 160–165°F). It should not be runny.
If the crust edges brown too quickly, cover with foil strips after 30–40 minutes.
Let cool 10–15 minutes before slicing. Serve warm.
That’s what this Christmas was for us: faith at the center, good food on the table, and enough grace to cover whatever didn’t go exactly as planned. We stewarded what we were blessed with, laughed when things folded instead of rolled, and let love do the rest of the work.
Here at the Donnelly Homestead, we use what we have, share what we can, and trust God to multiply the rest. If that sounds like a place you’d like to linger, you’re always welcome here. Pull up a chair. We’ll save you a plate. Tell me—what would you like on it?